
From Brew to Tap: The Complete Guide to Using a Coffee Keg for Nitro at Home
 Targets: Coffee Keg, Nitro Coffee, Cold Brew Setup, Home Brewing, TMCRAFT Coffee Kegs
Creamy mouthfeel, gentle sweetness, Instagram-worthy cascade—nitro coffee turns everyday cold brew into a café experience. The best part? You can do it at home with a compact coffee keg. This guide walks you from beans to silky nitro pour using a simple, reliable cold brew setup—and shows where TMCRAFT Coffee Kegs fit in for effortless results.
Why Nitro Coffee?
- Silky texture: Nitrogen micro-bubbles create a velvety body and thick head.
- Naturally sweeter: Lower acidity and perceived sweetness without added sugar.
- Always ready: Brew once, enjoy on tap all week.
What You’ll Need (Home Brewing Checklist)
Core gear
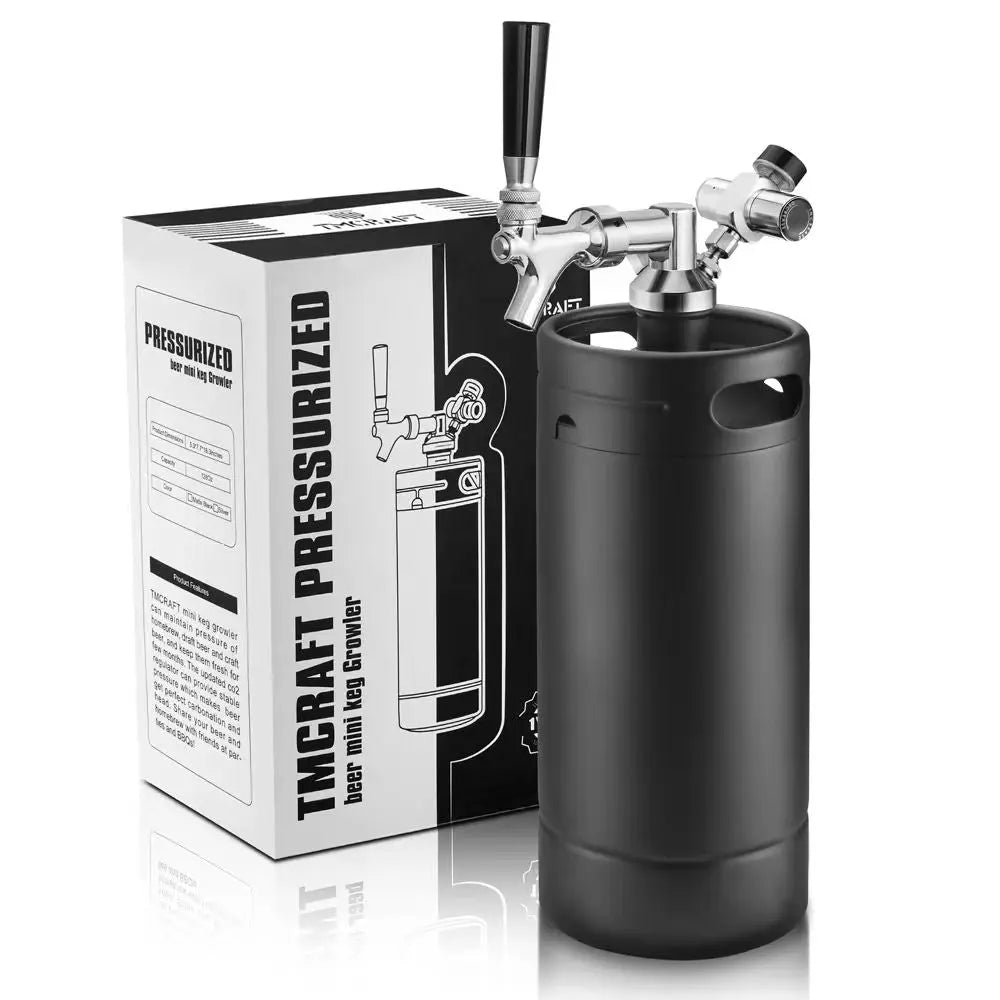
- Coffee keg (64 oz–2.5 gal): stainless steel, nitrogen-ready (PRV + stout faucet preferred)
- Regulator for N₂ or N₂O cartridges; or a nitrogen cylinder with regulator
- Tap/faucet: stout/creamer faucet enhances the cascade
- Food-grade lines & disconnects (ball-lock if using keg posts)
- Grinder (burr), large brew vessel, fine filter (paper + mesh), sanitizer
Why TMCRAFT Coffee Kegs
- 304 stainless for flavor neutrality and durability
- Tight seals and precise fittings to hold pressure
- Compact sizes that fit most fridges; portable for travel pours
Step 1 — Brew a Strong, Clean Cold Brew Base
- Grind: Coarse—like raw sugar.
- Ratio (Concentrate): 1:4 coffee to water by weight (e.g., 250 g coffee : 1 L water).
- Water: Cold, filtered (good water = good coffee).
- Steep: 12–24 hours in the fridge, covered.
- Filter: Pass through mesh, then paper until perfectly clear. Sediment = clogged lines.
Tip: If you prefer ready-to-drink strength, dilute concentrate 1:1 with cold, filtered water before kegging.
Step 2 — Prep and Sanitize Your Coffee Keg
- Disassemble posts/faucet, wash with fragrance-free cleaner.
- Rinse, then sanitize all cold-side surfaces (keg, lid, dip tube, lines, faucet).
- Drain but do not rinse sanitizer unless instructed by product label.
Why it matters: Coffee has oils; clean gear prevents rancid notes and protects your nitrogen system.
Step 3 — Fill, Purge, and Seal
- Pre-chill the filtered coffee in the fridge (cold liquid absorbs gas better).
- Transfer to the sanitized keg, leaving 10–15% headspace.
- CO₂ or N₂ purge (optional but ideal): Give 2–3 short bursts and vent to push out oxygen.
- Seat the lid: Briefly pressurize to ensure an airtight seal.
Step 4 — Nitrogenate for the Cascade
You have two simple paths:
A) Cartridge Method (Fast, compact)
- Attach N₂ (or N₂O) cartridge regulator to the coffee keg.
- Charge to 25–35 PSI; gently rock the keg 30–60 seconds to help dissolution.
- Rest cold for 1–3 hours (overnight is best) before serving.
B) Full Nitrogen Tank (Most consistent)
- Connect N₂ cylinder via regulator at 30–40 PSI for 12–24 hours cold.
- For the thickest cascade, push through a stout/creamer faucet.
Note: N₂O gives more sweetness and a dessert-like texture; N₂ is classic café nitro—dry, creamy, and stable.
Step 5 — Pour Like a Pro
- Keep keg, lines, and faucet refrigerator-cold (34–40°F / 1–4°C).
- Set serving pressure 25–35 PSI (higher than beer).
- Use a stout faucet; open the tap fully and pour into a chilled glass.
- Watch the waterfall settle into a dense, creamy head.
Dial-In Guide (Fast Troubleshooting)
- Flat / thin body: Increase pressure; ensure coffee is very cold; give the keg a gentle rock; check for leaks.
- Weak cascade: Use stout faucet; increase PSI; verify you’re using nitrogen, not CO₂.
- Watery flavor: Increase brew strength (higher coffee ratio) or shorten steep time to reduce over-extraction bitterness.
- Clogs / slow pour: Filter finer; clean lines; consider a short dip tube or floating pickup to avoid fines.
- Sour/rancid notes over time: Improve cleaning regimen; coffee oils require prompt post-session cleaning.
Flavor Upgrades (Add-Ons that Play Nice with Nitro)
- Vanilla bean or cacao nibs (post-brew, cold steep 12–24 h; strain thoroughly)
- Cinnamon stick (subtle warmth; quick steep)
- Simple syrup (add in the glass, not the keg, to avoid microbial growth)
- Oat milk nitro latte: 3:1 nitro coffee to oat milk, build in glass for creamy sweetness.
Cleaning & Maintenance (Every Batch)
- Empty keg; warm rinse immediately (coffee oils set fast).
- Circulate cleaner through lines and faucet 10–15 minutes.
- Rinse thoroughly; then run sanitizer.
- Dry disassembled; store with lid off to prevent odors.
- Inspect/replace O-rings regularly.
TMCRAFT tip: Keep a dedicated coffee-only keg and line set to prevent flavor crossover with beer.
Sizing Your System
- 64–128 oz (1.9–3.8 L): Ideal for daily home use; fits any fridge.
- 2–2.5 gal (7.5–9.5 L): Brunches, offices, small events; still portable.
- Batch once a week; nitrogen keeps flavor stable 5–7 days (often longer with clean gear and cold storage).
Quick Start Recipe (Balanced House Nitro)
- Coffee: 250 g medium roast (chocolate/caramel profile), coarse
- Water: 1 L filtered (concentrate) → dilute 1:1 to serve
- Steep: 16 hours at 38°F/3°C
- Gas: N₂ at 35 PSI, 12 hours cold, stout faucet
- Notes: Silk body, gentle cocoa, low acidity, thick head
Why Choose TMCRAFT Coffee Kegs
- Precision-sealed stainless steel for reliable nitrogen holds
- Compact, fridge-friendly form factors for apartment or home bar setups
- Easy-clean interiors and robust posts to stand up to coffee oils
- Travel-ready durability so you can bring nitro to brunch, picnics, or the office
The Bottom Line
A well-designed coffee keg turns your kitchen into a nitro tap—no café lines, no guesswork. Nail the cold brew setup, purge oxygen, charge with nitrogen, and pour cold through a stout faucet. With consistent process and reliable hardware like TMCRAFT Coffee Kegs, you’ll enjoy café-quality nitro coffee on demand, all week long.
Want a printable brew sheet (ratios, pressures, cleaning checklist) tailored to your keg size? I can generate one for you.