
DIY Nitro Coffee Bar: How to Set Up Your Coffee Keg System at Home
 Keywords: Coffee Keg, Nitro Coffee, Home Brewing, Cold Brew Setup, TMCRAFT Coffee Kegs
There’s something undeniably satisfying about sipping a smooth, creamy glass of nitro cold brew—especially when you’ve made it yourself. But instead of paying café prices every day, why not bring that premium experience home? With the right coffee keg system, you can turn your kitchen or garage into a fully functioning DIY Nitro Coffee Bar.
In this guide, we’ll show you how to build your own setup using TMCRAFT Coffee Kegs and walk you through everything you need for that velvety, cascading nitro coffee pour at home.
Why Go Nitro at Home?
Nitro coffee isn’t just a trend—it’s a revolution in cold brew. Infused with nitrogen gas, nitro cold brew is known for its:
- Creamy texture
- Smooth mouthfeel
- Low acidity
- Beautiful cascading pour
Setting up a nitro system at home gives you the freedom to enjoy barista-quality coffee any time, without the long lines or high price tag.
What You Need for a DIY Nitro Coffee Setup
Creating your own nitro bar at home is easier than you might think. Here’s a checklist to get started:
✅ 1. Cold Brew Coffee
Start with a strong cold brew concentrate. You can make it by steeping coarsely ground beans in cold water for 12–18 hours, then straining.
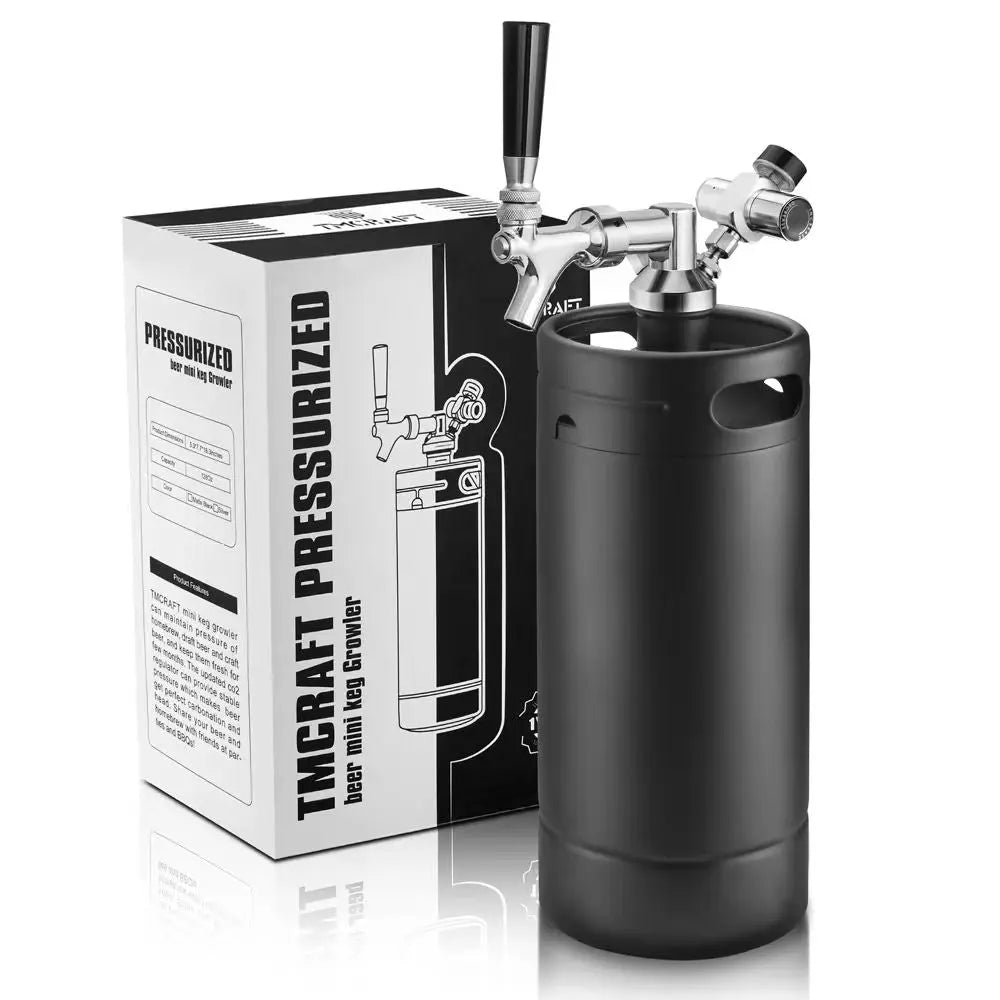
✅ 2. TMCRAFT Coffee Keg
Designed for nitro use, TMCRAFT Coffee Kegs are made from high-grade stainless steel and built to handle pressure. These kegs keep your brew fresh and deliver a rich, pressurized pour every time.
Key features:
- Compact and portable
- Pressure-rated stainless steel
- N2/N2O cartridge compatibility
- Easy-to-clean construction
✅ 3. Nitrogen (N₂) or Nitrous Oxide (N₂O) Cartridges
Nitrogen gives the classic cascading effect, while nitrous oxide creates more head and sweetness. TMCRAFT kegs are compatible with both.
✅ 4. Nitro Dispenser Cap with Tap
Your coffee keg needs a dispensing system designed for pressurized pours. TMCRAFT’s nitro tap systems ensure smooth delivery, just like a tap at your favorite coffee shop.
How to Set Up Your Home Nitro Coffee Bar
Step 1: Brew and Chill Your Coffee
Make your cold brew concentrate and chill it thoroughly. Cold temperatures help absorb nitrogen better.
Step 2: Fill the Coffee Keg
Pour the chilled cold brew into your TMCRAFT Coffee Keg. Leave about 10–15% headspace to allow room for gas pressurization.
Step 3: Charge with Nitrogen
Attach your nitrogen or nitrous oxide cartridge to the keg’s dispenser head. Shake the keg gently to help the gas dissolve into the coffee.
Step 4: Let It Infuse
For best results, let the keg sit for 12–24 hours in the fridge after charging. This allows full nitrogen absorption.
Step 5: Pour and Enjoy
Open the nitro tap, pour into a chilled glass, and watch that beautiful cascading effect. Enjoy smooth, creamy, café-style nitro coffee at home!
TMCRAFT Coffee Kegs: Why They’re the Best for Nitro Brewing
When it comes to setting up your home cold brew setup, TMCRAFT Coffee Kegs deliver professional-grade performance and convenience:
- Durable stainless steel construction
- Double-walled insulation for better temperature retention
- Compact size for easy fridge storage
- Nitro-specific dispenser options
- Easy cleaning and maintenance
Whether you're a coffee connoisseur or a brewing beginner, TMCRAFT makes the process simple and enjoyable.
Final Thoughts
With the right setup, brewing and pouring nitro coffee at home can be just as rewarding as making your own craft beer. A coffee keg from TMCRAFT lets you skip the coffee shop lines and enjoy premium quality brews whenever you want.
Ready to build your nitro bar?
Explore the full line of TMCRAFT Coffee Kegs and start sipping like a pro today.